Labels

Showing posts with label food. Show all posts

Monday, March 2, 2015

Trim Healthy Mama's Mama: My Mom's Meal Plan for Beginners

I haven't blogged in well over a year, but some of the ladies over at the THM Beginners board wanted me to share my mom's menu for her first week on THM, and this seemed to be the easiest way.

A little background: I have known about THM for awhile, as I am an Above Rubies magazine reader. I loosely followed the principles all last year, but then fell way off the wagon at the end of the year. I've been back on *for real* since the start of 2015.

My mom, Trish, was diagnosed late 2014 with degenerative arthritis in her spine and cysts in her breasts which was a pretty scary few weeks while we waited to find out what the suspicious lumps were. She read the book "The Maker's Diet" (which is referenced by Pearl and Serene in THM) and began eating clean and in a biblical model in order to heal her body.  Getting out of the drive-thru and eating clean had good results with a slow but reasonable weight loss. But, the diet is a little high in glucose-spiking foods like honey, so she wasn't experiencing rapid weight loss by any means.

When I explained that THM followed those same biblical guidelines AND was designed for weight loss, she was intrigued. She borrowed my book this past weekend and called me last night to "approve" her menu. I was quite impressed. This proves my theory, that the steepest learning curve on THM is for those that really aren't sure which foods are fats and which are carbs. Since my mom already had a good grasp on which foods fell into which categories, and which foods are "clean" versus which are "frankenfoods," she had a great head start. That said, she has no special THM ingredients like gluccie or whey protein or even ACV or liquid aminos. She was already using pure stevia extract so that ingredient is in her drinks, and sprouted grain breads are a part of the biblical diet she was already following. So this menu is pretty simple, although it includes some of her Maker's Diet foods that might not be in everyone's fridge.

Monday (S Day)
Breakfast: Whole goat's milk yogurt with blueberries and stevia, hot tea with stevia
Lunch: Roll ups made from Boar's Head natural turkey breast, sliced deli cheese (Boar's head), and mustard. Large green salad with drizzle of EVOO. Lemonade made from fresh squeezed lemons and stevia.
Snack: Handful of raw almonds
Dinner: Pan sauteed sirloin steak with sauteed portabella mushrooms and sliced onion, large green salad, stevia lemonade

Tuesday (S Day)
Breakfast: Same as Monday
Lunch: White fish cooked in butter and seasonings, broccoli in herb butter, stevia lemonade
Snack: Almonds
Dinner: Leftover steak from Monday with leftover buttered broccoli from lunch

Wednesday (S Day)
Breakfast: Same as Monday and Tuesday
Lunch: Salad bar salad from cafeteria at work, including boiled egg and cheese with EVOO and vinegar, unsweet tea from cafeteria with added stevia
Snack: a couple slices of Boar's Head all-natural turkey and a piece of cheese
Dinner: Skin-on chicken breast cooked in EVOO with large green salad dressed with EVOO.

Thursday (E Day)
Breakfast: Steel cut oats with a few fresh cherries and 0% Greek yogurt
Lunch: All natural turkey slices and mustard on 2 pieces of toasted Ezekiel bread, sliced cucumber with dill dressing made from 0% Greek yogurt. Stevia sweetened blueberry green tea.
Snack: Sliced cucumber with 0% Greek yogurt dressing.
Dinner: Boneless skinless chicken breast stuffed with a thin smear of 1/3 less fat cream cheese, topped with lots of all-natural salsa verde and served over 1/2 cup brown rice.

Friday (E Day)
Breakfast: Same as Thursday
Lunch: Same as Thursday
Snack: 0% Greek yogurt with small handful blueberries
Dinner: Lentils cooked with fat free chicken broth, organic canned diced tomatoes, seasoned with chili powder and cumin

Saturday (Freestyle Day)
Breakfast: Eggs cooked in butter with 2 slices turkey bacon (S)
Lunch: Leftover Lentils from Friday (E)
Snack: Berries or crudites (FP)
Dinner: Grass fed steak cooked with EVOO and seasonings, with large green salad (S)

Sunday (Restaurant Day S)
Breakfast: (at home) Eggs cooked in butter, goat's milk yogurt, berries
Lunch: Wendy's grilled chicken salad (no croutons, dressing from home), unsweet tea with added stevia
Snack: (at home) Goat's milk yogurt and almonds
Dinner: Local Mexican Restaurant chicken & steak fajitas with red and green bell peppers and onions. Topped with shredded cheese, sour cream, lettuce and salsa.

I gotta say, I'm pretty proud of this lady and will probably follow her plan pretty closely myself this week! I also want to add that Trish is a professional baker and spends her entire work day handling bread, pastries, and desserts. So this plan is going to be a challenge for her and she could use your prayers!
Top Mommy Blogs - Mom Blog Directory

It just takes one click to vote, and you can vote every day!

Tuesday, June 18, 2013

Non-Recipes: Kid's Favorite Ranch Chicken Strips


This recipe is always quickly devoured at our house. I serve it with a simple veggie and some macaroni and cheese usually. Because this dish is fried, I only put it in rotation about once a month or so, and I always fry in Smart Balance oil. Don't worry about the hot sauce in the egg mixture, it does not make the chicken spicy, it just adds some flavor and balance to the coolness of the ranch.

2 lbs. chicken breast tenders or chicken breast cut into strips
1 egg
1/4 cup milk
dash of hot sauce (I use Louisiana brand)
1/2 cup all purpose flour
1 packet Ranch dressing mix
salt and pepper
oil for frying


  1. Whisk together egg, milk, and hot sauce. Salt and pepper your tenders generously, and place in egg mixture. Soak for 10 minutes.
  2. While tenders are soaking in egg, mix flour and Ranch seasoning. Remove chicken from egg mixture and toss or dredge in flour mixture.
  3. Fry in 1 inch of oil at medium heat until golden brown and crispy. Drain on paper towels.

Like this non-recipe? Please click on the banner below to vote for my blog!! All you have to do is click, there are no extra steps to vote! Thanks for helping me get back on top!
Top Mommy Blogs - Mom Blog Directory

It just takes one click to vote, and you can vote every day!

Tuesday, June 11, 2013

Non-Recipes: Cheesy Bean & Rice Burritos


Lately, I have been seeing lots of supposed "recipes" on Pinterest that can barely live up to the name. Other than the list of ingredients and numbered instructions, there isn't much to them that would warrant being called a recipe. Most of them are just ideas for how to put together packaged foods and make a meal. But, here is the real truth: those are the ones that I love to make! Most of us do! When I click on a recipe link and see lots of ingredients, steps, and words like "julienne" and "braise" I tend to file those away for someday-when-I-have-more-time use. But, when I open up a page and there are just a few ingredients, all of which I can easily identify or already have and they are put together in a way that I hadn't thought of, those are the things that make it onto my weekly menu. So, for the next few weeks, I thought I would share a few of my personal "Non-Recipes." Creations of my own that don't require much skill in the kitchen and are always requested around my house. 
The first one is a recent family favorite:


My fella loves Taco Bell, and they used to have a burrito called the Cheesy Bean & Rice. They don't sell it anymore, so I now make them at home. Mine are better, in my opinion :)
Yes, my kids do eat this. They love it! This recipe makes 14-16 burritos, and they freeze great! We each eat one and then individually wrap and freeze the rest for lunches. Way better (and cheaper) then store-bought freezer burritos!
16 burrito-sized flour tortillas
2 large (16oz) cans of refried beans (I buy vegetarian, low sodium)
1 packet Spanish rice mix (I use Knorr)
2 cups grated sharp cheddar cheese
whatever toppings you like (salsa, sour cream, lettuce, etc)
  1. Prepare rice according to package instructions. Begin heating beans in a sauce pan over low-medium heat. As they warm, melt 1 cup of the cheese into them.
  2. Fill each tortilla with approx 1/3 cup of beans, half as much rice, and a sprinkle of cheese. Roll.
  3. Place burritos seam-side down in a hot, ungreased skillet or on a griddle. Cook approximately 2-3 minutes on each side to seal and sear. 
  4. Top as desired and enjoy or freeze for later!
I always make sure to save the little packets of sauce leftover from visits to Taco Bell, so that I always have a few packets of Fire Sauce to stick in the Fella's lunch box with his burritos!
Like this non-recipe? Help me out and click on the banner below. Please and thank you!
Top Mommy Blogs - Mom Blog Directory
It just takes one click to vote, and you can vote every day!

Thursday, June 6, 2013

How To Make Popcorn on the Stove


By request, to follow my post Snack For Pennies, here are instructions for making popcorn on the stove top. 
You will need:
1/4 cup popcorn kernels
1-2 tbsp oil (I use Smart Balance)
a medium-sized sauce pan with a lid
salt if desired (you can buy ultra-fine popcorn salt next to the regular salt and pepper)

Add your oil and kernels to your pan, shake around a little to coat the kernels in oil, and turn the heat to the highest setting. Do not cover yet. When the first kernel pops, put the lid on. Begin shaking the pan back and forth, maintaining contact with the burner. You want to keep the kernels moving to prevent burning. Remove from heat when your pan becomes full or when pops are about 2 seconds apart.

A few hints:
-If steam builds up in the pan, the popcorn may have a tough texture. Choose a lid with a vent if possible.
-I have purchased store brand kernels and all the name brands. They all taste the same. Some claim to be fluffier, but I have never noticed any difference. Buy whichever is the best value per ounce.
-Spritzing your popcorn with a little cooking spray or Kernel Season's popcorn spray will help your salt or any other seasonings stick.
-You can make kettle corn by adding about 1/4 cup of sugar to the kernels and oil before popping starts. Sprinkle with a little salt afterwards for the perfect salty-sweet combination.
-To make a sweet treat, salt your popcorn a little bit, and then drizzle with melted chocolate. Stir to coat as you add any mix-ins you like. We like milk chocolate with M&Ms or Sno Caps and white chocolate with slivered almonds.
-Some other yummy flavors to try; chili powder and lime juice, garlic powder and Parmesan cheese, cayenne pepper, or experiment with anything else in your spice cabinet!

Top Mommy Blogs - Mom Blog Directory

It just takes one click to vote, and you can vote every day!
Tuesday, June 4, 2013

Snack For Pennies!!


I am not going to give you a whole long post about all of the ways that microwave popcorn is bad for you. If you just begin to Google the word "popcorn" you will see things like "cancer" and "Alzheimer's" in conjunction with the word. I don't want cancer or Alzheimer's, but that isn't why we stopped eating microwave popcorn.

A little over a year ago, I was combing a grocery store ad for deals. I noticed that they had 1 pound bags of bulk popcorn for $1. Yes, one dollar! For a pound! The fella and I had popcorn for snacks several times each week and we always made a bag or two for family movie night on the weekends. That meant that I was buying one box (10 bags) every two weeks. While microwave popcorn is not terribly expensive, I was spending approximately $8 each month on popcorn. The ad for bulk popcorn got me wondering just how much money I could save in my grocery budget if we tried it the "old fashioned way."

My family did not have a microwave for most of my childhood, so my parents always made popcorn on the stove. A quick call to my mother gave me the info that I was looking for; I would only need about 1/4 cup of kernels to make a bowl full of popcorn. Guessing about 2 ounces, this would mean that I could make this snack eight times for a dollar!! I really can't think of any other snack for the whole family that costs less than 7 cents! That's not 7 cents per serving or even per person, that's [to be exact] 6.25 cents for the whole bowl!

The fella was skeptical when I announced my big idea. But the very first bowl had him convinced. It tasted better and was healthier. Not to mention the novelty of "homemade" popcorn. We made popcorn on the stove top several times per week for about 6 months before I stumbled upon the Nordic Ware Popcorn Popper at Target.


This awesome bowl and lid give me everything that I love about non-microwave popcorn, in the microwave! Quick, convenient, and you don't even have to add oil like you do in a pan! As an added bonus, it only cost $8.99.

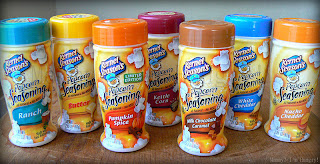
We have accumulated quite a collection of Kernel Season's popcorn seasonings and have become quite the popcorn chefs at our house!


I can't imagine buying the bagged stuff ever again. We eat popcorn even more often now, and I have had fun making chocolate popcorn with all sorts of mix-ins (almonds, M&Ms, Sno Caps) for special treats and parties! I even had a little popcorn buffet at a baby shower I hosted last year!


Whether it's for health, taste, or budget, I challenge you to try making real popcorn for yourself!


Top Mommy Blogs - Mom Blog Directory

It just takes one click to vote, and you can vote every day!

Tuesday, May 7, 2013

An Honest Report On Our 2-Week Restaurant Fast


It might seem like we do a lot of "fasting" around here. I use the word fast to describe purposely abstaining from an activity or item, for a set time, for a defined purpose. I have blogged about our family Media Fast and my Negativity Fast. Our most current endeavor was a 2 week restaurant fast. We have tried this in the past and failed pretty pitifully. Last year we attempted seven days without restaurants. I think we made it for five. For many families, this does not sound difficult at all. I wish we were one of those families!

The two big reasons that we visit restaurants too much are convenience because we are so busy on so many weeknights, and cravings, because sometimes a certain meal or restaurant just sounds way more appealing then whatever I planned to cook.

It really is ridiculous, and each time we have evaluated our finances we come to the same conclusion: we are hemorrhaging money in our food budget, and it is all because of eating out! When we first participated in the Crown Financial Ministries Biblical Financial Study, we discovered that we spent more at restaurants then we did on rent! Holy moly! We have definitely improved since then, but not nearly enough.

The thing is, I really love to cook!  With the proper planning, I have plenty of time in my schedule to cook too. There is absolutely no reason for us to be eating out so often.

The goal of staying away from restaurants for two weeks was to get us in the habit of eating at home. I tried to overcome our main challenges with my meal planning.

  • To avoid temptation based on convenience factors, I bought a few quick-to-prepare frozen food items. I don't usually buy this type of food, but I thought it would help when things get hectic.
  • To avoid temptation based on cravings, I tried to make an extremely varied meal plan. I thought of all the places that we usually eat out, and tried to put similar dishes on our menu. So, for example, I made sure to include an Asian-inspired dish and a homemade pizza, since Asian and pizza are frequent eating out go-to spots for us.
Week one went really well. There was even a day that the kids and I ended up with a long wait, away from home, right around lunch time. I had not planned ahead and packed a lunch to take along, and the mood in my car was quickly deteriorating. Tempted to hit up a drive-thru, I finally opted to head to a convenience store for a few snack items and wait to have lunch at home. Although shopping at the convenience store did require that I buy food out, it wasn't a restaurant, it required some thinking ahead, and our $5 in snacks was much less costly than our typical fast food bill. It also reminded me to prepare snacks for those unexpected times!

At the end of week one, we had an unexpected offer for free babysitting for a date night. I will admit that we seized the opportunity and went for sushi and appetizers at a favorite Japanese restaurant. Although, admittedly, that was in violation of our plan for the week, it actually led us to a really great idea. We decided that (after the fast) we would put a couples date night and a family date night on our calendar on alternating weeks. If we are faithful to eat at home for the entire week, we will reward ourselves with a dinner out on Friday or Saturday. But if we do not eat at home all week, the date night will have to be a non-restaurant activity. I'm really excited about this new plan, because not only does it insure that we are setting aside special evenings, it also gives us an incentive to eat at home every week, not just during this two week period.

Week two was going as planned until the weekend hit. Epic fail. After tee ball on Saturday we visited a favorite deli for lunch. I am pleased to say that we at least ate dinner at home (not typical for us on a Saturday night). Sunday we hit our favorite Irish restaurant for their family-friendly brunch, and had dinner at the ballpark during a minor-league baseball game.

I really, really wanted to report back that we accomplished the whole two weeks with no restaurant visits. But, of course, I will not lie to you. We are imperfect people and we are not capable of living a perfect life, but we are striving to do a little better each day. I can happily report back that because of this "fast" we got back into the habit of thinking about our dining out and being more purposeful about it. For example, after a family lunch date this past Monday, my fella looked at me and said "Okay, we eat at home until our [planned] breakfast out on Saturday!" and it feels good to know that we both have the same goal in mind. It also got me back into menu planning with creativity. Planning meals that I want to cook and the family wants to eat. Finding recipes that we are all excited to try. So, progress was made even if perfection was not achieved!

If you enjoyed what you just read, PLEASE click the banner below. You don't have to do anything but click one time!!! Help me get back to being the #1 Religious/Spiritual blog on Top Mommy Blogs!! Thank you, thank you, thank you!!!!!

Top Mommy Blogs - Mom Blog Directory

It just takes one click to vote, and you can vote every day!

Friday, November 23, 2012

Let's Give Thanks Part V: 1 Turkey Carcass 3 Meals

I really hate the word carcass. But when I consulted my handy thesaurus for less graphic sounding alternatives, the options were pretty morbid themselves; body, cadaver, corpse, remains, shell....its not pretty.
But I needed to be specific that these are not recipes for leftover turkey, these are recipes that utilize the bones and the bits of meat that cling to them. One 20 pound turkey carcass can yield 3 recipes, and depending on your serving sizes and size of your family, at least 6 meals. 
My method for brined turkey is here, but if you did not brine your turkey, you will want to add some extra seasoning, which will be listed at the end of the post. If your family serves the wings and drumsticks on the bone, you will not be able to do all 3 recipes, so just pick your favorite and make one nice pot of soup. Also, you will probably want to start this process in the morning, as it is kind of an all day thing.
1. You will begin with 3 large pots and a very sharp knife. Remove the wing, leg and thigh bones from one side of the bird and place in a pot. Do the same for the other side, adding those to the second pot. Finally, put the entire body of the bird into your third pot, cutting into several pieces if necessary to fit. Cover all 3 with water and bring to a boil. Reduce heat and allow to simmer for as long as is needed for bones to be completely bare. It took mine about 4 hours. As mentioned, if your turkey was brined you will not need to add anything to your water and bones, the saltiness and seasonings will be sufficient to make a wonderful stock.
2. Remove all bones and cartilage from each pot and continue simmering as you add the remaining ingredients to each one.

For Herbed Noodle Soup add:
2 diced carrots
1 stalk celery, diced
1 bay leaf
1 tsp thyme
1 tsp rosemary
chunks of leftover meat (if more meat is desired)
2 cups farfalle or other noodles (add after vegetables are tender)

For Spicy Sicilian Soup add:
2 diced carrots
1 stalk celery, diced
1 green bell pepper, diced
1 clove garlic, minced
1/2 onion, diced
1 can Rotel, do not drain
chunks of leftover meat (if more meat is desired)
1 cup ditalini or other small pasta (add after vegetables are tender)
Black pepper to taste

For White Chili add:
2 cans navy beans, drained
1 can cannellini beans, drained
2 packages "White Chicken Chili" seasoning
chunks of leftover meat (if more meat is desired)

Simmer each of these until the vegetables are tender and the pasta is al dente. For the White Chili you need only simmer until flavors are combined and beans are heated through. Because I serve soup with sandwiches or salads for dinner, I then separated each recipe into 2 gallon sized bags, then froze them flat on a cookie sheet so that they can be neatly stacked in the freezer. We eat all of our leftover turkey meat with the leftover sides or on sandwiches, so I did not add any additional meat to my soups and they are still very rich and hearty. A lot of meat comes off of the bones since I am not very thorough about "picking" the turkey. Talk about being resourceful! With the original holiday dinner,  our leftover meals, plus the soups and chili, one turkey has yielded 10 meals for my family! 

*If your turkey was not brined, you will want to add the following to each pot of water and bones: 1 whole stalk of celery, 1 whole carrot, 1 quartered onion, salt and pepper to taste. Remove the whole aromatics when you remove your bones.


Wednesday, November 21, 2012

Let's Give Thanks III: Friends-giving & Brined Turkey


I really like to cook Thanksgiving, and I have an extra special love for all of those turkey day leftovers. For many years, while we were stationed away from home, I cooked the whole feast and then we invited over as many single sailors as we could find to enjoy the meal with us. Since we are "permanent" where we are now, at least every other year there is a family meal to attend, which leaves me without my beloved leftovers. So two years ago I began the tradition of hosting a "Friends-giving" a few days before the actual holiday.
This gives me the opportunity to do the cooking that I enjoy so much, and gives my fella the opportunity to do the socializing and entertaining that he loves so much. Typically we invite friends that live far from home or for some other reason don't have holiday plans. We eat, we drink, we laugh, and most importantly, we give thanks. We are thankful for the friends that are in our life and for the unique relationships that we have with them. Friends never take the place of family, but having strong friendships is such an important part of a healthy, balanced life.

“Friendship is unnecessary, like philosophy, like art… It has no survival value; rather it is one of those things that give value to survival.”
-C.S. Lewis
One of the reasons that we host "Friends-giving" is so that we can enjoy an awesome brined turkey that I started making a few years ago. My fella says it "ruined all other turkey" for him. It is a variation on Alton Brown's famous Good Eats turkey from 1999. 

In a large stockpot combine:
2 cups kosher salt
2 cups sugar
1/4 cup whole peppercorns
1-2 whole cinnamon sticks
1/2 cup dried rosemary (or throw in the contents of the whole jar if you don't have quite that much)
1/4 cup dried sage
2 tbsp dried thyme
Aromatics for roasting:
1 apple, quartered
1 onion, quartered
4 cloves garlic, peeled but whole

Fill up the pot with water and slowly dissolve brine seasonings over low heat. Allow to simmer for at least 10 minutes to fully bring out the flavors of the dried herbs. Completely cool in the refrigerator. Place thawed turkey in a large oven bag in the roasting pan in case of leaks. With help, pour cooled brine into the bag. Allow to brine in the refrigerator for at least 24 hours, turning once during that time. Remove turkey, discarding liquid but retaining herbs (I just pour the brine through a strainer to do this). Add herbs back into cavity of turkey. Place aromatics in a bowl with 1/2 cup water and microwave for 5 minutes. Add steeped aromatic (minus the water) to the cavity of the turkey. Pat whole turkey dry with paper towels and coat liberally with canola oil. Place uncovered in 500 degree oven for 30 minutes, then reduce temperature to 350 for the remainder of cooking time, tenting as necessary if the bird begins to over brown.

Monday, November 19, 2012

Let's Give Thanks Part I: Better Than Your Mama's Sweet Potatoes


Today begins what will be a 4 part mini-series about Thanksgiving and everything that I find important about it.

I am not going to share every single one of my Thanksgiving Day recipes, because, lets face it, I will need things to blog about for future holidays. That, and, most people already know their favorite way to do it, and I don't want to change all that up.
There is one part of the traditional fare that I think everyone should change, and that is the sweet potatoes. Most people serve them in a casserole topped with tiny marshmallows. While you may like this dish, I am going to go out a limb and assume that it is not your favorite dish on the table. Yeah, you probably eat it, but you wouldn't eat it by itself.
My sweet potato recipe is so good that I make it at every holiday. Every. single. one.
Thanksgiving, Christmas, New Years, Easter, Tuesday.....you get the idea.
And I make a quadruple batch.
And everyone asks for the recipe.
And we eat the leftovers by themselves (if we have any!) for several days afterward, sometimes even for breakfast.
Still not sold?
They are made in the crock pot.
If that didn't get you, I don't know what will. So here it is folks,
my (sort of) world famous
"Better than your mama's" Sweet Potatoes
and may I add, that even my mama, one of the most talented cooks that I know, says that these are better than hers!

Ingredients:
3 large cans of sweet potatoes, drained
1 stick of real butter
1 cup chunky applesauce
2 granny smith apples, cored and diced (with peel on)
1/2 cup brown sugar
2 tablespoons ground cinnamon
1/2 tsp ground ginger
dash of nutmeg

Combine all ingredients in slow cooker. Allow to simmer all day on low, at least 4 hours. You are looking for a chunky but cohesive mixture. The longer you allow it to simmer, the more integrated the flavors become, and the more delicious. 

A very happy Thanksgiving, from our household to yours!


Friday, September 21, 2012

The Best Chili in the Universe


This really is the best chili in the universe...to me anyway. I have tried a billion gazillion variations of this formula, but I always go back to this one. It is great for the slow cooker, but you can simmer it on the stove too. And as you can see in the photo, it is good on everything. I serve it on hot dogs, over fries or tots, and on top of a bed of corn chips. I have also melted it into Velveeta for a yummy dip. I often freeze the leftovers in single portion sizes to pull out for lunch on a cool or rainy day. It is a fall favorite! I make it a lot on game days, it is a perfect football companion.

Ingredients:

  • 1 pound ground turkey 
  • 1 package original chili seasoning
  • 1 package spicy chili seasoning
  • 1 can dark red kidney beans
  • 1 can light red kidney beans
  • 2 cans pinto beans
  • 1 32 oz. can crushed tomatoes
  • 2 cans Rotel with liquid
  • 1 large onion, diced
  • toppings: diced raw onion, sliced green onion, shredded cheese, sour cream, saltine crackers, corn chips, hot sauce (like Texas Pete), Sriracha (we like it hot around here)
Brown ground turkey in skillet with diced onion. While the meat is browning, rinse all of your beans. Combine meat with remaining ingredients in slow cooker and cook on low for at least 4 hours. Even though everything is already cooked, allowing the mix to simmer for awhile really melds all those delicious flavors.

I should note that I think I originally saw this recipe on Semi Homemade with Sandra Lee but it's hard to be sure, since I have been making it for like six years.


This post is linked up at the following super fun linky parties:


Saturday, April 28, 2012

Ultra-Healthy Smoothies for Oblivious Kids aka "The Groovy Smoothie"

In case you are not on the preschool TV up-and-up, there is a little show on Nick Jr. called "The Fresh Beat Band." The peppy, colorfully dressed singing actors on the show enjoy grabbing a snack and some impromptu a Capella at a little joint called "The Groovy Smoothie." So that is what we started calling smoothies at our house, and at least twice a week the man cub and I enjoy a groovy smoothie packed with fruit and veggie and dairy nutrition. And he is oblivious to all of the above. All he knows is that they are yummy and the blender is noisy. And the man cub loves yummies and noise!

What follows is a loose recipe for a groovy smoothie a la MommyJustine. This can be tweaked and changed based on your taste and what you have in the fridge.

In your blender combine:

-approx 1/3 cup skim milk
-approx 1/4 cup yogurt (we use Greek)
-1/2 banana (overripe is awesome)
-whatever other fruit you have, up to 1 cup (smoothie pictured has orange slices and blackberries)
-1 handful baby spinach leaves (this makes it extra groovy and adds no weird flavor
-about 5 ice cubes

Blend, adding more ice or milk as needed to achieve desired consistency.

    Now share with your child, who will be blissfully unaware that he/she is eating so many nutritious ingredients! Don't forget to get excited about making and drinking them, a little enthusiasm goes a long way in encouraging kiddos to try something new!
  • Linked up at Wow Me Wednesdays!